☃️ Banner logo ☃️ Up to 50% Off ☃️

Spellbinders Blog

Layered Curved Borders with Your Cards

Layered Curved Borders with Your Cards

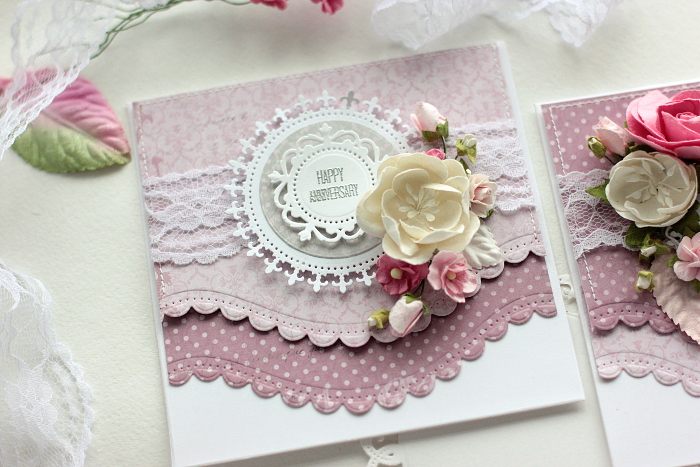
Cardmaking is such a relaxing process. So today I, Elena Olinevich, show you how you can play with the papers and dies while creating beautiful background for your cards.
I love using pink color as the main tone for my cards. So this time I mixed the papers and use the front and the backside paper from the same paper sheet for two different cards. I started with die cutting the papers using A2 Curved Borders Two Card Creator Etched Dies. What I've added - I die cut one more extra layer and topped one layer over. This scalloped edge looks nice, but in case to separate your two paper layers, I advice you to mount the upper layer on the foam pads. You will notice how it pops up from the background. To help to create a flower cluster I've added the circle using the Royal Circle Etched Dies. For one card I used the two from the die set, one to make the lace look circle and the smaller one for my sentiment, that I heat embossed after stamping. For my second card I used the same papers that I mixed by order. To place my sentiment I used my most often used die from Romantic Rectangles Two Edged Dies. To make the cards a bit different, I mixed not only the paper order, but mirrored the flowers as well. Actually it's quite easy to create many cards that look different using the same papers and embellishments. Now it's your turn to try . Supplies:
Read more

Special Occasion Flower Top Gift Boxes

Special Occasion Flower Top Gift Boxes

Hello friends! Today I have these gift boxes to share with you created with Spellbinders Flower Top Box Die Set from my Celebrate the Day Collection. You can also use these boxes as party favors for special occasions like bridal showers, birthday parties and holidays. They are really easy to make, all the cutting and scoring lines are in the die ready for you to assemble the box in no time.  
    Instructions: 1. Die cut gift box with Flower Top Box Die Set. You need to die cut 2 pieces from 2 sided design paper. Die cut 6 small square top layers and then adhere to box as pictured below.       2. Glue both pieces together at the center of the base and then glue square top layers.   3. Fold all scored lines and then assemble box by gluing the side tabs under the side panels.   4. Fold top petals back and then curl with a bone folder or pencil. Use ribbon to tie together and your gift box is done.         Spellbinders Supplies:   Flower Top Box Die Set Spellbinders Platinum 6 Die Cutting and Embossing Machine Tool ‘N One Foam Applicator – Circle For Too ‘N One   Other Supplies: Maja Design Paper (Enjoying Outdoors, Summer Time and Walking in the Forest Collections), Scrapbook Adhesives by 3L® (E-Z Runner® Micro Refillable Dispenser), May Arts Silk Ribbon.   Thanks for visiting and have a wonderful week! Marisa Job www.marisadesigns.blogspot.com

Read more

Special Occasion Flower Top Gift Boxes

Special Occasion Flower Top Gift Boxes

Hello friends! Today I have these gift boxes to share with you created with Spellbinders Flower Top Box Die Set from my Celebrate the Day Collection. You can also use these boxes as party favors for special occasions like bridal showers, birthday parties and holidays. They are really easy to make, all the cutting and scoring lines are in the die ready for you to assemble the box in no time.  
    Instructions: 1. Die cut gift box with Flower Top Box Die Set. You need to die cut 2 pieces from 2 sided design paper. Die cut 6 small square top layers and then adhere to box as pictured below.       2. Glue both pieces together at the center of the base and then glue square top layers.   3. Fold all scored lines and then assemble box by gluing the side tabs under the side panels.   4. Fold top petals back and then curl with a bone folder or pencil. Use ribbon to tie together and your gift box is done.         Spellbinders Supplies:   Flower Top Box Die Set Spellbinders Platinum 6 Die Cutting and Embossing Machine Tool ‘N One Foam Applicator – Circle For Too ‘N One   Other Supplies: Maja Design Paper (Enjoying Outdoors, Summer Time and Walking in the Forest Collections), Scrapbook Adhesives by 3L® (E-Z Runner® Micro Refillable Dispenser), May Arts Silk Ribbon.   Thanks for visiting and have a wonderful week! Marisa Job www.marisadesigns.blogspot.com

Read more