Video: Creating Layers of Floral Rainbows
Posted by Michelle Short on June 28, 2021

Video: Creating Layers of Floral Rainbows

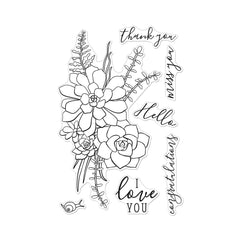
Hello there, Michelle here and today I have a card to share with you using the Succulent Bouquet  stamp set. I thought about going traditional with my colours but then I thought, what if I went in a completely different direction and create a rainbow coloured succulent!

Here is the video showing how I made the card:

If you are having trouble viewing this video, please try watching it  HERE on YouTube. 

I started off my card by taking a piece of watercolour paper and stamping the large Succulent Bouquet image on to it using Intens-ified Black Ink . I adhered the panel to a board using tape (to try and prevent warping) and then spritzed it with water using the Water Mist Bottle

Rainbow Succulent Bouquet by Michelle Short for Hero Arts

With a paintbrush, I then dropped in rainbow colours of Liquid Watercolors. I used Pink , Orange , Dandelion , Pine , Deep Ocean and Purple . I then spritzed it again with water and left it to dry. Once dry, the panel was die cut using a Nesting Rectangle Infinity Die . It was adhered to an A2 card base made from Pitch Black Cardstock  with tape runner adhesive. 

Rainbow Succulent Bouquet by Michelle Short for Hero Arts

I took the Succulent Bouquet image again and stamped it on to white cardstock with more Intens-ified Black Ink . It was coloured using Copic Markers, keeping the colours situated in the same areas as the background panel. It was then die cut out using the Succulent Bouquet Frame Cuts . I also cut the die twice from Dove White Cardstock

Rainbow Succulent Bouquet by Michelle Short for Hero Arts

I adhered the die cuts together to create a thicker image piece and then adhered it on top of the watercoloured piece with Precision Glue . I took the sentiment from the Message Strips Stamp & Cut XL and stamped it on to Pitch Black Cardstock with Clear Embossing & Watermark Ink . I applied White Detail Embossing Powder and heat set. It was die cut using the coordinating die and adhered on to the card with foam tape. To finish off, I added a few black enamel dots from the Neutrals Hero Hues Enamel Dots pack. 

I really like how it looks like the colour from the succulent is bursting out on to the card! Thank you so much for stopping by today, I hope you have a wonderful week. Happy crafting!

Click on products to shop:
CM541 Succulent Bouquet - Hero Arts
DI894 Succulent Bouquet Frame Cuts...
DC286 Message Strips Stamp & Cut XL -...
DI198 Nesting Rectangle Infinity Dies...
PD122 Pink Liquid Watercolor
PD124 Orange Liquid Watercolor
PD110 Liquid Watercolors Dandelion
PD115 Liquid Watercolors Pine
PD113 Liquid Watercolors Deep Ocean
PD119 Liquid Watercolor Purple
WM101 Water Mist Bottle - Hero Arts
AF435 Intens-ified Black Ink Pad -...
AF419 Clear Embossing & Watermark Ink...
PW122 White Detail Embossing Powder -...
GW101 Precision Glue - Hero Arts
CH322 Neutrals Hero Hues Enamel Dots...
PS325 Hero Hues Dove white - Hero Arts
PS323 Hero Hues Premium Cardstock...

  • Hummingbird Garden Sympathy Card Tutorial with Layered Stencils and 3D Embossing

    Categories:Embossing

    Hummingbird Garden Sympathy Card Tutorial with Layered Stencils and 3D Embossing

    Hi, crafty friends! Lea Lawson here with you today, creating a card featuring the beautiful new Butterfly Garden collection by Simon Hurley. I’m sharing my step-by-step process in easy-to-follow photos and instructions! To start, we are going to ink blend the Layered Hummingbird Garden stencils in numbered order. Align stencil 1 over top of a 6” x 9” Classic White cardstock panel, then ink blend...

  • Ink Blending for Cardmaking: Tips, Techniques, and Tools for Beautiful Results

    Beginner’s Guide to Cardmaking

    Ink Blending for Cardmaking: Tips, Techniques, and Tools for Beautiful Results

    Hello cardmakers, Lisa Tilson here, and today we’re going to be talking about ink blending. This is such an integral part of cardmaking, as ink blending can be used for many different designs in many ways. You might want to blend inks to create a background for a stamped or die-cut scene. You might want to add ink blending onto a stamped, pressed, or foiled...

  • 2 Floral Birthday Card Ideas with the Just Add Cake Cardmaking Kit

    BD-1049

    2 Floral Birthday Card Ideas with the Just Add Cake Cardmaking Kit

    Hello there, Michelle Short here and I am delighted to be sharing two cards today using the Just Add Cake Birthday Cardmaking Kit. Both cards feature the Garden Party Etched Dies. I combined them with the shaker domes and sequins on the first card, and for the second, combined them with the mug from Birthday Brew Etched Dies, as well as some extra colours of...